|
Operation Archery -
the First Tri-Service Operation.
Vaagso and
Maaloy, 27th Dec
1941
 Background Background
The
raid on the Norwegian islands of Vaagso and Maaloy, codenamed
Operation Archery, broke new ground for combined
operations. It was the first time air support was integrated into the raiding
plans from the outset.
[Map courtesy of Google Map Data 2017].
Vaagso and
Maaloy lie on the Norwegian coast between Bergen and Trondheim. They had no
significant strategic importance but the raid would tie up German forces in the
defence of Norway that might otherwise be deployed on the eastern front.
Churchill was keen to mount a major raid, ideally against Trondheim, where
damage to dock and repair facilities would help to protect allied convoys to
Murmansk by denying their use to the enemy but this was not feasible in late
1941. A diversionary raid on the
Lofoten Islands, 300 miles to the north,
was mounted to coincide with Operation Archery.
Plans & Preparations
Mountbatten was appointed
to the post of Combined Operations Adviser in October 1941. He decided that a
sizeable raid was required to cause the enemy to deploy larger numbers of troops
in Norway than would otherwise be the case. The target also provided an
opportunity to damage or destroy German military establishments in the area.
This was not the first such planned operation. On December 9th, No 6
Commando and half of No 9 Commando, under the codename Operation Anklet,
steamed for the Norwegian town of Floss in the landing ship HMS Prince
Charles. An accidental grenade explosion
on board caused casualties including those skilled in navigation. With his
navigational capability severely compromised, the Senior Naval Officer
called the raid off.
Rear Admiral H M Burroughs and Brigadier Charles Haydon were appointed on
Dec 6 to be naval and military commanders on Operation Archery. At their
disposal were No 3 Commando, two troops of No 2 Commando, a medical detachment
from No 4 Commando, a party of Royal Engineers from No 6 Commando primarily for
demolition jobs and a Royal Norwegian Army
 detachment under the command of
Major Linge. In all, there were around 51 officers and 525 other ranks. Colonel
John Durnford-Slater, who had been involved in the detailed planning, was to be
in charge of the landing party. detachment under the command of
Major Linge. In all, there were around 51 officers and 525 other ranks. Colonel
John Durnford-Slater, who had been involved in the detailed planning, was to be
in charge of the landing party.
[Photo; The press
party on board HMS Prince Leopold relaxing on their way to Vaagso.
Official photographer, Edward G Malindine is in the foreground. Photo
courtesy of the Malindine family].
Many had served with Haydon
on the first Lofoten raid of the previous
March, which was an undefended action. 'Vaagso and Maaloy' was an entirely
different proposition. There were German troops on both Islands and significant
coastal defences to overcome. Intelligence sources indicated that 150 men from
the 181st Division, a solitary tank and 100 construction workers were billeted
in the town. Four squadrons of fighters and bombers, totalling 37 planes, were
operating in the area from bases at Herdia, Stavanger and Trondheim. No enemy
warships were thought to be in the area.
The
small island of Maaloy (also known by other names) was less than 500 metres by
200 metres. It had a concentration of 4 coastal defence guns, ammunition stores,
oil tanks and barracks for the troops. Its position, at the southern mouth of
main sea access to the Maaloy and South Vaagso communities, was ideal to protect
them, their oil factory, fish factories and a power station, from attack. It was
known that enemy convoys assembled further north in the fjord, offering the
possibility of another target.
 By the 15th of December,
the raiding forces had assembled and training exercises were largely completed.
The flotilla, comprising the Cruiser HMS Kenya fitted with 6-inch guns,
four destroyers and two landing craft, HMS Prince Leopold and HMS
Prince Charles, left Scapa Flow in the Orkney Islands on Christmas eve.
After about 100 miles on their northerly journey, they were forced to divert to
Sullom Voe in the Shetland Islands due to a severe westerly gale, that was
causing material damage. Prince Charles took onboard 145 tons of sea
water, which was pumped out and other damage was repaired. The men enjoyed the
respite and Christmas dinner in relative comfort. They resumed their journey of
300 miles to the north west, on the evening of the 26th. By the 15th of December,
the raiding forces had assembled and training exercises were largely completed.
The flotilla, comprising the Cruiser HMS Kenya fitted with 6-inch guns,
four destroyers and two landing craft, HMS Prince Leopold and HMS
Prince Charles, left Scapa Flow in the Orkney Islands on Christmas eve.
After about 100 miles on their northerly journey, they were forced to divert to
Sullom Voe in the Shetland Islands due to a severe westerly gale, that was
causing material damage. Prince Charles took onboard 145 tons of sea
water, which was pumped out and other damage was repaired. The men enjoyed the
respite and Christmas dinner in relative comfort. They resumed their journey of
300 miles to the north west, on the evening of the 26th.
[Map courtesy of Google Map Data 2017].
The
Raid
The next morning, at 07.00
hours, they rendezvoused with HMS Tuna, a submarine on station at
Vaagsfjord to provide an accurate navigational reference point and general
assistance. Landing Ships Infantry, LSIs , were positioned out of view of the
main batteries on Malloy. Fire was opened on the coastal defences by the
warships at 08.48 hours, initially with a salvo of star shells from HMS
Kenya to light up the island, followed by a heavy bombardment of 500 shells
in 10 minutes from all five war ships.
Smoke
bomb screens, to obscure the path of the advancing troops as they landed on the
beaches, were provided by Hampdens from RAF Bomber Command. Throughout these
carefully choreographed procedures, air cover was provided by Beaufighters and
Blenheims from Wick on the Scottish mainland and Shetland, round trips of 650
and 400 kilometres respectively.
 The
Commandos were formed into 5 groups. The 1st group landed at Hollevik, about 2
kilometres south of South Vaagso, to disable a German stronghold there. The 2nd
group landed just south of the town itself, while the 3rd group landed on Maaloy
Island to mop up after the bombardment. The 4th group was held as a floating
reserve and the 5th group passed by Maaloy into Ulvesund on the destroyer HMS
Oribi. They landed to the north of South Vaagso to prevent German
reinforcements getting through from the north. The
Commandos were formed into 5 groups. The 1st group landed at Hollevik, about 2
kilometres south of South Vaagso, to disable a German stronghold there. The 2nd
group landed just south of the town itself, while the 3rd group landed on Maaloy
Island to mop up after the bombardment. The 4th group was held as a floating
reserve and the 5th group passed by Maaloy into Ulvesund on the destroyer HMS
Oribi. They landed to the north of South Vaagso to prevent German
reinforcements getting through from the north.
[Photo; An oil factory burns in Vaagso, 27
December 1941. British troops can be seen on the quay in the foreground. © IWM
(N 459)].
The Germans were taken
completely by surprise but fought back bravely. On Maaloy, three of the four
coastal guns were knocked out by the accurate bombardment, which was lifted only
when the invading troops were about 50 metres from the landing beach. Because
the Germans had so little time between the end of the bombardment and being
overrun by the 105 Commandos, fighting there was over in just 20 minutes.
However, in the action, Linge was killed.
The German survivors were
rounded up, demolition work completed and the group crossed the short stretch of
water to join the fighting in South Vaagso. Meantime, group 1 at Hollevik
experienced less resistance than expected, since 8 defenders were having
breakfast in South Vaagso. Group 1 also joined the South Vaagso skirmish and
later group 4, the floating reserve, was called in since German resistance was
greater than expected. It later transpired that 50 crack troops were on
Christmas leave in the town at the time.
On board the destroyer HMS Orbis, No 5 group were by then north of
Malloy, accompanied by
HMS Onslow. The men landed without opposition and blew craters in
the road to prevent enemy reinforcements from North Vaagso joining the battle.
They also destroyed the telephone exchange at Rodberg. Merchant ships, the RE
Fritzen and an armed trawler, the Fohn, came into view. Those
under power beached themselves when they saw the White Ensign, while the Fohn
and the Fritzen were boarded under sniper fire from the shore. They hoped
to find confidential papers or secret code books. Around this time, two ME 109s
and two JU 88s were active in the area. No 5 group later joined the fighting in
South Vaagso.
 Resistance
was not completely overcome in the street fighting but all the major demolition
jobs were accomplished including the power station, coastal defences, the
wireless station, factories and lighthouse. 150 Germans were killed, 98 Germans
and 4 Quislings made prisoner and 71 Norwegians took passage back to England.
Further up the fjord, the destroyers sank 9 ships, totalling 15,000 tons and
shot down four Heinkels. Both Herdia and Stavanger airports were bombed, the
wooden runway of the former suffering sufficient damage to limit activity. Resistance
was not completely overcome in the street fighting but all the major demolition
jobs were accomplished including the power station, coastal defences, the
wireless station, factories and lighthouse. 150 Germans were killed, 98 Germans
and 4 Quislings made prisoner and 71 Norwegians took passage back to England.
Further up the fjord, the destroyers sank 9 ships, totalling 15,000 tons and
shot down four Heinkels. Both Herdia and Stavanger airports were bombed, the
wooden runway of the former suffering sufficient damage to limit activity.
[Photo;
shows Lieutenant O'Flaherty being helped to a dressing
station with an injury that resulted in the loss of an eye. He remained in the
army and eventually became a Brigadier. The soldier on the right is Derek Gordon
Page - a commando. He subsequently left the commandos and served with the Gurkas
in India, fighting in Burma and eventually ending the war in Indonesia.
© IWM (N 495).
See "Correspondence" below for further comment about this photo].
There were many instances of bravery on both sides in the taking and defending
of entrenched positions. At 13.45 hours, Colonel Durnford-Slater ordered the
withdrawal from South Vaagso to begin. It was led by No 2 troop with No 1 in
rearguard. The force re-embarked at 14.45 hours, as the short Arctic day drew to
a close. Of the 70 army casualties, 17 were killed and of the 8 Navy
casualties, two were killed. In addition two Beaufighters and a Blenheim
(Hampden?) were lost.
Each Commando unit had a Medical Officer and a number of medical orderlies attached
to it, as first line support. On the Vaagso raid, they carried a haversack
containing basic medical supplies, such as shell dressings, bandages, morphia
and water. Further medical facilities were available on the transport ships,
on this occasion provided by Captain
Sam Corry RAMC.
 The
Outcome The
Outcome
This was the first time all
three services combined in support of an amphibious raid against a defended
coast. As Mountbatten said at the outset "... nobody knows quite what is going
to happen and you are the ones who are going to find out." The RAF provided air
cover for over 7 hours and undertook diversionary raids elsewhere. None of the
British ships was hit by enemy bombs but a phosphorous bomb from a disabled
British plane hit one of the landing craft, resulting in some casualties.
[Photo; Wounded
being helped onto a landing craft at Vaagso, 27 December 1941. © IWM (N 481)].
Much had been learned by
both sides. The Germans later reinforced their Norwegian Atlantic wall with the
deployment of 30,000 extra troops. Hitler perhaps had concerns that Norway might
well be "the zone of destiny in this war."
The British Press Unit was
very active during the raid and some of the most graphic and dramatic
photographs in WW2 were taken on this raid. These photos and eye witness reports
were later used in morale boosting propaganda initiatives, to boost the morale
of the British public and armed services, when the tide of the war favoured the
enemy.
The future pattern of
sizeable raids and landings had been set.
Summary of Action
 Allied
Forces: Air-
Bomber Command and Coastal Command; Sea -
Cruiser H.M.S. Kenya, Landing Ships H.M.S. Leopold and Prince
Charles, Submarine H.M.S. Tuna plus four destroyers;
Land - No 3 Commando, two troops of No 2 Commando, a medical
detachment from No. 4 Commando and demolition experts from No. 6 Commando, a
Royal Norwegian Army Detachment. Allied
Forces: Air-
Bomber Command and Coastal Command; Sea -
Cruiser H.M.S. Kenya, Landing Ships H.M.S. Leopold and Prince
Charles, Submarine H.M.S. Tuna plus four destroyers;
Land - No 3 Commando, two troops of No 2 Commando, a medical
detachment from No. 4 Commando and demolition experts from No. 6 Commando, a
Royal Norwegian Army Detachment.
Axis Forces:
Air - Luftwaffe Heinkels, ME 109s and JU 88s.
Land - 150 men from 181 Division, 50 troops on leave in the area.
[Photo; British troops with Norwegian civilians on HMS PRINCE
LEOPOLD after the raid. © IWM (N 474)].
Outcome (positive) -
successful destruction of coastal defences, oil and fish factories, radio
transmitters, stores, a lighthouse, a power station, 9 merchant ships totalling
15,000 tons and four Heinkels. 30,000 additional German troops deployed to the
Norwegian sector taken from other fronts but notably the Atlantic Wall. 150
Germans killed, 98 captured and 71 Norwegians took passage to the UK.
Outcome (negative) - Commandos: 2 Officers and 15 OR killed, 5 Officers
and 48 OR wounded, Norwegians: 1 Officer killed and 2 OR wounded, Royal Navy 2
OR killed and 2 Officers and 4 OR wounded
 and RAF 31 killed (2 Hampden's, 7 Blenhiem's and 2 Beaufighters were lost). and RAF 31 killed (2 Hampden's, 7 Blenhiem's and 2 Beaufighters were lost).
The Army,
Norwegian and Naval casualties come from PRO document DEFE 2/83. The RAF
casualties come from DEFE 2/83 (for the Coastal Command losses) and Bomber
Command losses 1941, W.R. Chorley,
Midland Publishing (for the Bomber Command losses).
[Photo; Official War
Office photographer, Edward G Malindine & Jack Ramsden of Movietone News on
board HMS Prince Leopold wearing German helmets they had "acquired" during the
raid. Photo courtesy of the Malindine family].
Veterans Return in 2005
OPERATION
ARCHERY VETERANS
I attach a
photograph of the 7 veterans who attended a commemorative trip to Vaagso
and Maaloy in 2005. The esteem in which they were held by the local people
was very obvious.
The veterans met up in Bergen and travelled
to Maaloy on a WWII g un boat - the fully restored "HITRA" given to
the Norwegian Navy by the USA. Whilst in Maaloy they were treated like
royalty, attending many functions and parades, also laying a wreath on the
grave of the only civilian killed on the raid. They were presented with
plaques and a painting by the Norwegian Chief of Defence and the Mayor of
Vaagso. un boat - the fully restored "HITRA" given to
the Norwegian Navy by the USA. Whilst in Maaloy they were treated like
royalty, attending many functions and parades, also laying a wreath on the
grave of the only civilian killed on the raid. They were presented with
plaques and a painting by the Norwegian Chief of Defence and the Mayor of
Vaagso.
[Left
to right - Charles Stacey, Arthur Ashby, Tom Sherman, Paddy (laurence)
Murphy, Paddy (Patrick) Habron, Dusty (Osmond) Miller, Henry Brown
(Commando Association)].
The trip was
funded by the National Lottery Returning Heroes Fund.
Howard P Habron
Further Reading
There are around 300 books listed
on our 'Combined Operations Books' page. They, or any
other books you know about, can be purchased on-line from the Advanced Book
Exchange (ABE). Their search banner link, on our 'Books' page, checks the
shelves of thousands of book shops world-wide. Just type in, or copy and paste
the title of your choice, or use the 'keyword' box for book suggestions. There's
no obligation to buy, no registration and no passwords.
List of
Commando operations in Norway
The Vaagso Raid by
Joseph Devins Jr. Published by Robert Hale 1967.
Storm from the Sea
by Lt Col Peter Young. Published by William Kimber 1958.
In Harms Way
by Brian Crabb. Published 1998. The story of HMS
Kenya from her build to break up including a chapter on the Vaagso raid.
Hardback with a full-colour cover, 250 pages. ISBN 1 900289 02 4
Supplement
to The London Gazette dated 2/1/48.
Commandos and Rangers of
World War 2 by James D. Ladd. Published in 1978 by MacDonald & Jane's. ISBN
0 356 08432 9
Commandos 1940 - 1946
by Charles Messenger. Published by William Kimber, London 1985. ISBN 0 7183 0553
1
Commando by John
Dunford-Slater. Published by Kimber 1953 - from the pen of one of the major
players.
The Watery Maze by
Bernard Fergusson published 1961 by Collins.
Correspondence 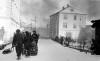
Hello Geoff,
In going through my
great uncle's photos, I saw references to the Norway
Commando raids which l ed
me to your website. Major Tom Festus Connolly served
in the West Surrey Regiment, (British Indian Army
Overseas) for most of his career but he also took
part in two Norwegian raids at
Svolvaer, and
Vasgso. The attached photos, taken at Vaagso, may be
of interest. I'm sure Tom would have been more than
happy to ed
me to your website. Major Tom Festus Connolly served
in the West Surrey Regiment, (British Indian Army
Overseas) for most of his career but he also took
part in two Norwegian raids at
Svolvaer, and
Vasgso. The attached photos, taken at Vaagso, may be
of interest. I'm sure Tom would have been more than
happy to
 share
them. He died in Canada in 1989. share
them. He died in Canada in 1989.
Carmel Smyth (Canada)
 Dear
Geoff, Dear
Geoff,
I am trying to find
information and possibly a picture of a monument that was dedicated Aug 30th
1970 on the island of Maloy in Norway to commemorate those members of H.M. Armed
Forces who died in the combined operation which took place on December 27th
1941. My uncle Pilot Officer Roderick McLachlan with the RCAF has
his name inscribed on the monument which is described as being made of granite,
six metres high surmounted by a golden ball held by two hands.
Thank you for any help you can provide in my search. I am 78 years old and
trying to gather up some family history to leave to my five children and nine
grandchildren.
Ronald McLachlan
Ronald, with the help
of his son, found the memorial he was looking for.
[Photo
reproduced here under the
GNU Free Documentation License].
Dear Geoff,
Great site!
I read your account of the Vaagso raid with interest. My father was Denis
O’Flaherty who is referred to in your text alongside a photo of him being led
away for medical attention. Prior to this, he had been wounded in the shoulder
but he continued in the action including the storming of an enemy strong
point. He was further wounded during which he lost his right eye, was shot
through the roof of his mouth losing many teeth, shot through the jaw and his
spinal vertebrae. One of his ribs was latter extracted and used to repair the
damage to his spine. He was in hospital for nearly 2 years.
My father returned to active service and fought in Normandy with 3 Commando
Brigade before being wounded again in late June 44. On this occasion he was
hospitalised for four months. Once he had recovered, he returned to 3 Commando
Brigade and participated in the Rhine crossing at Wesel in March 45. He
was then transferred to the Far East but was spared further combat duty after
the atomic bombs dropped on Hiroshima and Nagasaki caused the surrender of
Japanese forces. My father then returned to the Royal Artillery (RA), which he
had joined in 1938, and served in the UK/Indian Army occupation forces in Japan.
Post WW2 he served in Korea, first with the US Army, and later with 45 Regt
RA. He was awarded a US Bronze Star for bravery and mentioned in dispatches. He
was evacuated in 1951 with pneumonia, subsequently serving in Malaya, during the
emergency there, as commanding Officer, 34 Regt RA, when he raised and formed 29
Commando Regt RA. He later commanded New College, Royal Military Academy,
Sandhurst. In 1975 he was awarded the CBE.
He died in 1980 aged 59. I am the youngest of my father’s 8 children. My mother
met my father in Japan in 1945 and she has just celebrated her 92nd birthday.
I hope this is of interest and I wish you all success with the website.
Best regards,
John O'Flaherty
Vaagso Raid
Photograph. My Dad, Derek Page, was one of the two soldiers in the photo on
this webpage supporting Lieutenant O' Flaherty after he sustained an eye wound.
A few years ago my brother was flying over Norway on a business trip seated
beside the Queens' Messenger. In conversation my brother explained our father's
role in the Vaagso Raid. "Amazing" replied the Queens Messenger," Brigadier
O'Flaherty was my boss and always wore an eye patch. He died two years ago".
My father reluctantly
left the Commandos when our mother became very ill. He subsequently served in
India and Burma and met my mother in Sumatra after it was liberated. She is
Dutch and at the age of 15 was interned in Kampili by the Japanese. My father
became a tea and coffee planter in Uganda after the war and remained there until
Idi Amin began his wicked reign.
Regards
Jacqueline Bennett
(6/14)
Vaagso Raid
Photograph.
Dear Geoff,
Your website has a
photo of Lieutenant O'Flaherty being helped to a dressing station. The
commando supporting him on the left in the photo is my father Herbert
Cecil Wright. After the Vaagso raid, he was injured in a 'live fire
exercise' and returned to No7 and later No1 Battalion of the Royal
Norfolk Regiment where he served until the end of WWII, being awarded a
MM in Normandy.
Regards 
Peter Wright
|